MAGLOGIX
Extended Guideway Kit for Magnetic Drill Press

- SKU:
- SA-MAG-MX-V-EG
- Shipping:
- Calculated at Checkout


Frequently bought together:
Description
Maglogix® MX-V Extended Height Guideway Kit. Allows use of drill bits up to 12" long with your MX-V drill rig!
Instructions for replacing standard height guideway with extended height guideway:
- Raise the guideway to the maximum height.
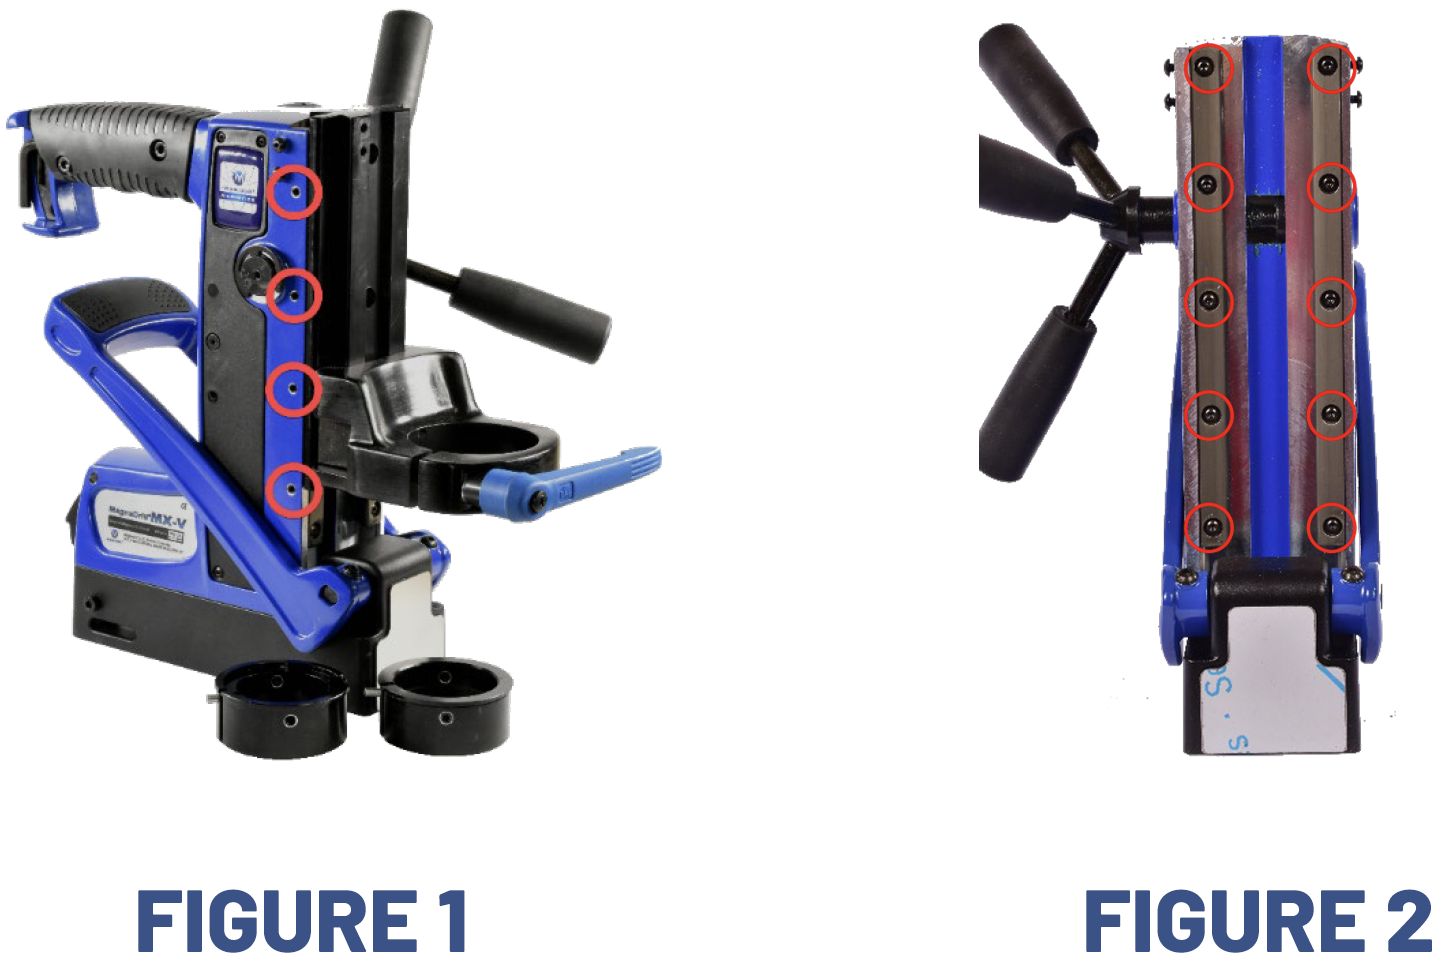
- Loosen the 4 gib screws (red circles) by half a turn with 2.5mm hex key. (Figure 1)
- Use a screwdriver to pry off the E-Clip and the two washers on the pinion gear shaft. Use your other hand to prevent losing the clip when it pops off!
- Pull the shaft out an inch or so to disengage the gears.
- Pull the guideway up and out of the housing.
- At this point, the pinion gear can be pulled out and installed in the other side to reverse the spoke handles if desired.
- If the new Extended Guideway slides in, you do not need to replace the rails. If Extended Guideway will not slide in, replace the rails as shown in the steps below...
- Remove the 10 screws that hold the two brass rails in place using 2.5mm hex key. (Figure 2) Discard these rails and original guideway.
- Install the new rails, only tighten the screws on the Right Side Rail at this time. Tighten the Left Side screws so that the heads are below the rails. Rails are reversible left to right.
- Insert the Taller Guideway and lower to the bottom. Re-engage the pinion shaft gear by pushing in.
- Using only very slight turns, adjust the gib screws so that the guideway slides smoothly but is firmly controlled by the rails.
- Raise the guideway to expose the rail screws, tightening them as they become visible. Pull the pinion shaft out and remove the guideway to access the top screws. Reinstall the guideway.
- Make any final adjustments to the gib screws with very slight turns.
- Replace the washers and E-Clip.
Resources:
Videos
View AllClose
1 Review
-
Extended Guideway Kit for Magnetic Drill Press
WORKS GREAT AND EASY TO INSTALL
Related Products
Related Products

Magnetic Drill Press w/ Updated Tool Holder
MAGLOGIX
$1,199.00
Cordless Magnetic Drill Press MX-V with switchable magnet technology. Provides superior holding power, weighs less, and has a smaller footprint compared to other magnetic drill presses. Weighs in at...
SA-MAG-MX-V

Laser Guide for Magnetic Drill Press
Paragon Tools
$78.95
This laser will aid in positioning your magnetic drill press. The outside diameter of the guide’s housing has been sized to fit into the standard drill collar/adapter for the Maglogix MagnaDrill,...
PT120

Magnetic Drill Press Universal Adapter for 1/2" Drill, Keyless Chuck
MAGLOGIX
$228.84
Magnetic Drill Press Universal Adapter for 1/2" Drill, Keyless Chuck The Universal Adapter allows the MX-V to be used with almost every 1/2” Corded or Cordless Drill ever made. Its Ball Bearing...
SA-MAG-MX-V.UA.500.Keyless

Magnetic Drill Press Universal Adapter for 1/2" Drill, Keyed Rohm Chuck
MAGLOGIX
$265.93
Magnetic Drill Press Universal Adapter for 1/2" Drill
Now includes high quality made in Germany Röhm brand keyed chuck!
The Universal Adapter allows the MX-V to be used with almost every 1/2”...
SA-MAG-MX-V.UA.500.KEYED

Updated Tool Holder for Magnetic Drill Rig
MAGLOGIX
$182.25
Replacement Tool Holder Only for the Strong Arm Magnetic Drill Rig SA-MAG-MX-V. New & Improved!
SA-MAG-MX-V-TH